We lived in La Crosse, Wisconsin, for one year and we wish it could've been longer. We loved everything about it, except for the winter that lasted for 6 months and the bazillions of mosquitoes that descended upon us during the muggy summers.
I started quilting in La Crosse and tried my first paper piecing project with this candy box heart pattern.
Don't you just love quilts with legs?! Anyway, I usually avoid anything with hearts, but this was a special group project. We wanted the young women at church to have an ongoing service experience. Somehow we found out that the Renal Dialysis Unit at Gundersen Lutheran Hospital was drab and needed some holiday decor to cheer up patients who spent many hours at a time there.
We kicked off this partnership by taking a tour of the unit and learning about dialysis. Then, after that, each month we would devote one of our weekly meetings to making decorations and one of them to decorating the unit.
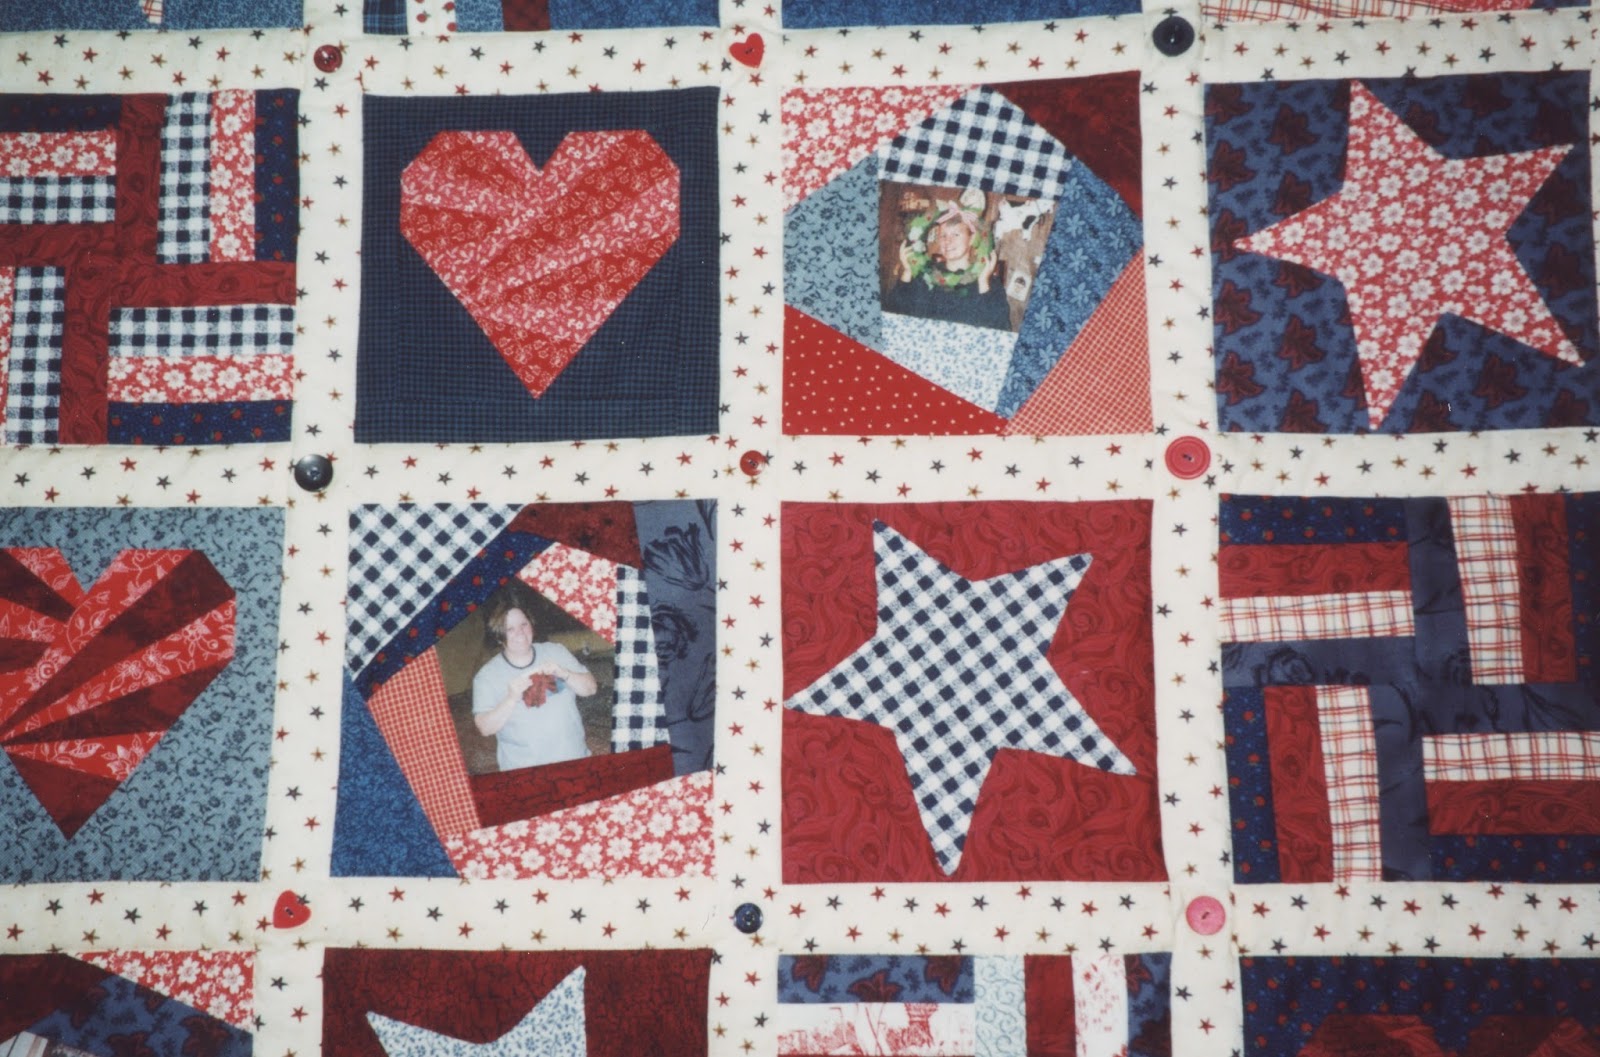
We worked on the quilt together during a few of our weekly meetings. I know we taught the girls how to applique and they made most of the star blocks. I think some of them also helped sew the 4-patch blocks. I can't remember if I made all the hearts or if we taught some of them to do that too.
We gave this quilt to the unit to hang on the wall permanently. I wonder if it's still there? I hope the girls and other leaders cherish this experience as I much as I do.
Showing posts with label paper piecing. Show all posts
Monday, July 13, 2015
Saturday, May 18, 2013
Kathy's Wonky Paper-pieced House
Wonky. Hubs says that I love that word and use it all the time. So, when the Music City Modern Quilt Guild challenged me to create my own 12-inch block, I just had to make a wonky house.
The challenge was to use Moda Flirt fabrics. It's not my favorite fabric (all pink and cutesy flowery), but I made it work and I'm pretty happy with how it turned out.
I would call this pattern 'intermediate level' because you have to sew it in sections.
Here's what it looked like before I trimmed it up.
When you do a pattern in sections like this, you have to remember to leave a 1/4" seam allowance on all edges of each section. It's a good idea to leave a 3/8" or 1/2" seam allowance on the outside four edges to allow you more flexibility for squaring up your block after all the sections are sewn together.
Now it's time to tear off the paper and sew the sections together. I find that it's easier to tear the paper off of each section in reverse numeric order. For some reason it always works better.
Here's a miniature version. I reduced my 6-inch block pattern to 75%. I wanted to show my fellow guild members why paper piecing is an awesome way to deal with tiny pieces and sharp angles.
No, you can't have the $20! I took this picture so you could get some perspective on how small some of the pieces are and so I could use some fabrics that I like from my stash.
The challenge was to use Moda Flirt fabrics. It's not my favorite fabric (all pink and cutesy flowery), but I made it work and I'm pretty happy with how it turned out.
I would call this pattern 'intermediate level' because you have to sew it in sections.
Here's what it looked like before I trimmed it up.
When you do a pattern in sections like this, you have to remember to leave a 1/4" seam allowance on all edges of each section. It's a good idea to leave a 3/8" or 1/2" seam allowance on the outside four edges to allow you more flexibility for squaring up your block after all the sections are sewn together.
Now it's time to tear off the paper and sew the sections together. I find that it's easier to tear the paper off of each section in reverse numeric order. For some reason it always works better.
And here it is again, Kathy's Wonky House.
No, you can't have the $20! I took this picture so you could get some perspective on how small some of the pieces are and so I could use some fabrics that I like from my stash.
Here's the pattern if you want to give it a try. Let me know how it goes.
Sunday, June 3, 2012
Outer Space Quilt
Last year I made this paper-pieced rocket quilt block for Joy. I was so excited to design the pattern myself.
Joy received all kinds of fun space blocks from the Long Distance Quilting Bee and made this quilt for her nephew. My favorite block is the one directly below mine - so unique and very modern! Zoom in and check out the cute quilting in orange thread. I wonder if she did it herself?
Here's a closer look before it was quilted. So, this reminds me that I have two years of blocks to put together. I better get started!
Monday, May 21, 2012
Elefante
Lately I'm a paper piecing maniac. I got this elephant pattern from A Quilter's Ark by Margaret Rolfe. One of the gals in the Long Distance Quilting Bee wanted 'anything baby'. The pattern calls for embroidered details, like an eye and stuff. But I kind of liked it without all the details. I think a checked body and a plaid ear is detail enough. What do you think?
Thursday, May 10, 2012
Paper-pieced Pitcher
That title is a tongue twister. Just see if you can say it five times fast. This is one of the first blocks that I managed to make without changing my mind about the fabrics a gazillion times. I wasn't sure I was going to like it - too girly for me. But, I really love it.
The April challenge for the Long Distance Quilting Bee was to make something with blues and greens with a light background using our current favorite method. I continue to be intrigued with paper-piecing so that's what I did. Once again, I used a pattern from my favorite quilting book. One of these days I'm going to design my own pattern again, like this one.
Thursday, March 8, 2012
Quilted Jars
There are two challenges for March's Long Distance Quilting Bee - the garden one and the jar one. Amy, the Bee coordinator, wanted the standard jar pattern without the bottom strip. The first jar I made for her is filled with strawberries, the only fruit fabric that didn't make it into the fruit salad blocks that I made for her last year.
My husband thought the other block was a sand art jar. I wish I would've thought of a clever idea like that! Look below to see what it really is.
Broken Butterfly Wings
By the way, I started to wonder how people make those sand art jars. It's pretty amazing. Check it out.
Wednesday, March 7, 2012
Paper-pieced Butterfly
This has got to be one of the most complex quilt blocks I've ever made. One of the challenges for March's Long Distance Quilting Bee block was to make something related to gardening. I got the pattern from this book, the same book that the kimono and crane came from. The pattern calls for this block to be 6" x 6". That's just loco! Fortunately Joy wanted bigger blocks. Check out the amazing points you can get with paper-piecing.
Butterfly Guts
Saturday, February 11, 2012
I Think I'm Turning Japanese
The challenge for January was to make an Asian-inspired block. I had no idea what to make, but Mary Jo Hiney saved my hiney! She has the most amazing paper-pieced patterns in this book.
My first choice was to make the crane below, but my goal is to use up my stash and to NOT buy new fabric. It didn't seem like my on-hand fabrics were going to work with the requested color scheme of saffron, rusts, golds and greens.
Anyhoo, a lot of trial and error and gnashing of teeth went into this block. Is there anyone out there who gets the color combination right the first time? If so, I want to know your secret.
I tried three different combinations before I finally came up with something I liked, although I would have preferred to have had a subtly patterned light background rather than just the plain light yellow that was in my stash.
In the first two, the kimonos didn't 'pop' because the background color blended in too much with the kimono fabric. I loved the third fabric, but it seemed like the scale of the print was too big for such a mini kimono. Anyway, the kimono finally 'popped' against a lighter background.
And wouldn't you know it, I ended up using the first 'kimono' fabric that I had picked out. I should learn to trust my instincts.
And, here's a retro video for your viewing entertainment.
Friday, December 23, 2011
Leaves and a Star
I'm obsessed with the color green. I want everything in my house to be green - the walls, the art, the furniture, the dishes, the linens, my clothes, etc. My husband laughs at me because of my obsession with rusty metal, especially rusty GREEN metal. Anyway, I got excited when Evelyn requested a quilt block with lots of green and leaves and stuff. I've been wanting to try these paper-pieced leaves so it was the perfect excuse.
For December Pat requested some sort of yellow or gold star. I used a pattern similar to this except the square in the middle is a nine patch.
Tuesday, June 7, 2011
Paper-pieced Rocket
I'm part of a Long Distance Quilting Bee. Last month's theme was space - outer space, inner space, time/space continuum, whatever space. After searching cyber space for a free pattern and having no luck, I decided to design my own.
Not wanting to destroy my original, I photocopied the sketch and sewed it onto lightweight green masking paper to extend the pattern to the right size and shape. I also extended the sewing lines onto the green paper.
Below is the final product. I'll change some things about it before making it again, but not too shabby for my first design. I'm not crazy about the rocket fabric, but that was the best I could come up with from my stash. I love the exhaust fabric though! And, can you see who's in the capsule?
Did you notice that the shape of the exhaust is different in the sketch and in the quilt block? My hubby politely informed me that the physics of the exhaust was wrong in the sketch.
Subscribe to:
Comments (Atom)


